


Baselight SDI & HDMI output setting
SDI Setup guide
Primary video output - SDI Blackmagic Ultrastudio 4k mini
Video mode UHD/DCI 4K
Signal YCbCr 422 10bit
Interleaved (2wire) HD3G-A
HDMI - ON
SDI output Scalia - 422 full to legal
Project Setting


SDI Setup guide
Primary video output - SDI Blackmagic Ultrastudio 4k mini
Video mode UHD/DCI 4K
Signal YCbCr 422 10bit
Interleaved (2wire) HD3G-A
HDMI - ON
SDI output Scalia - 422 full to legal

Project Setting

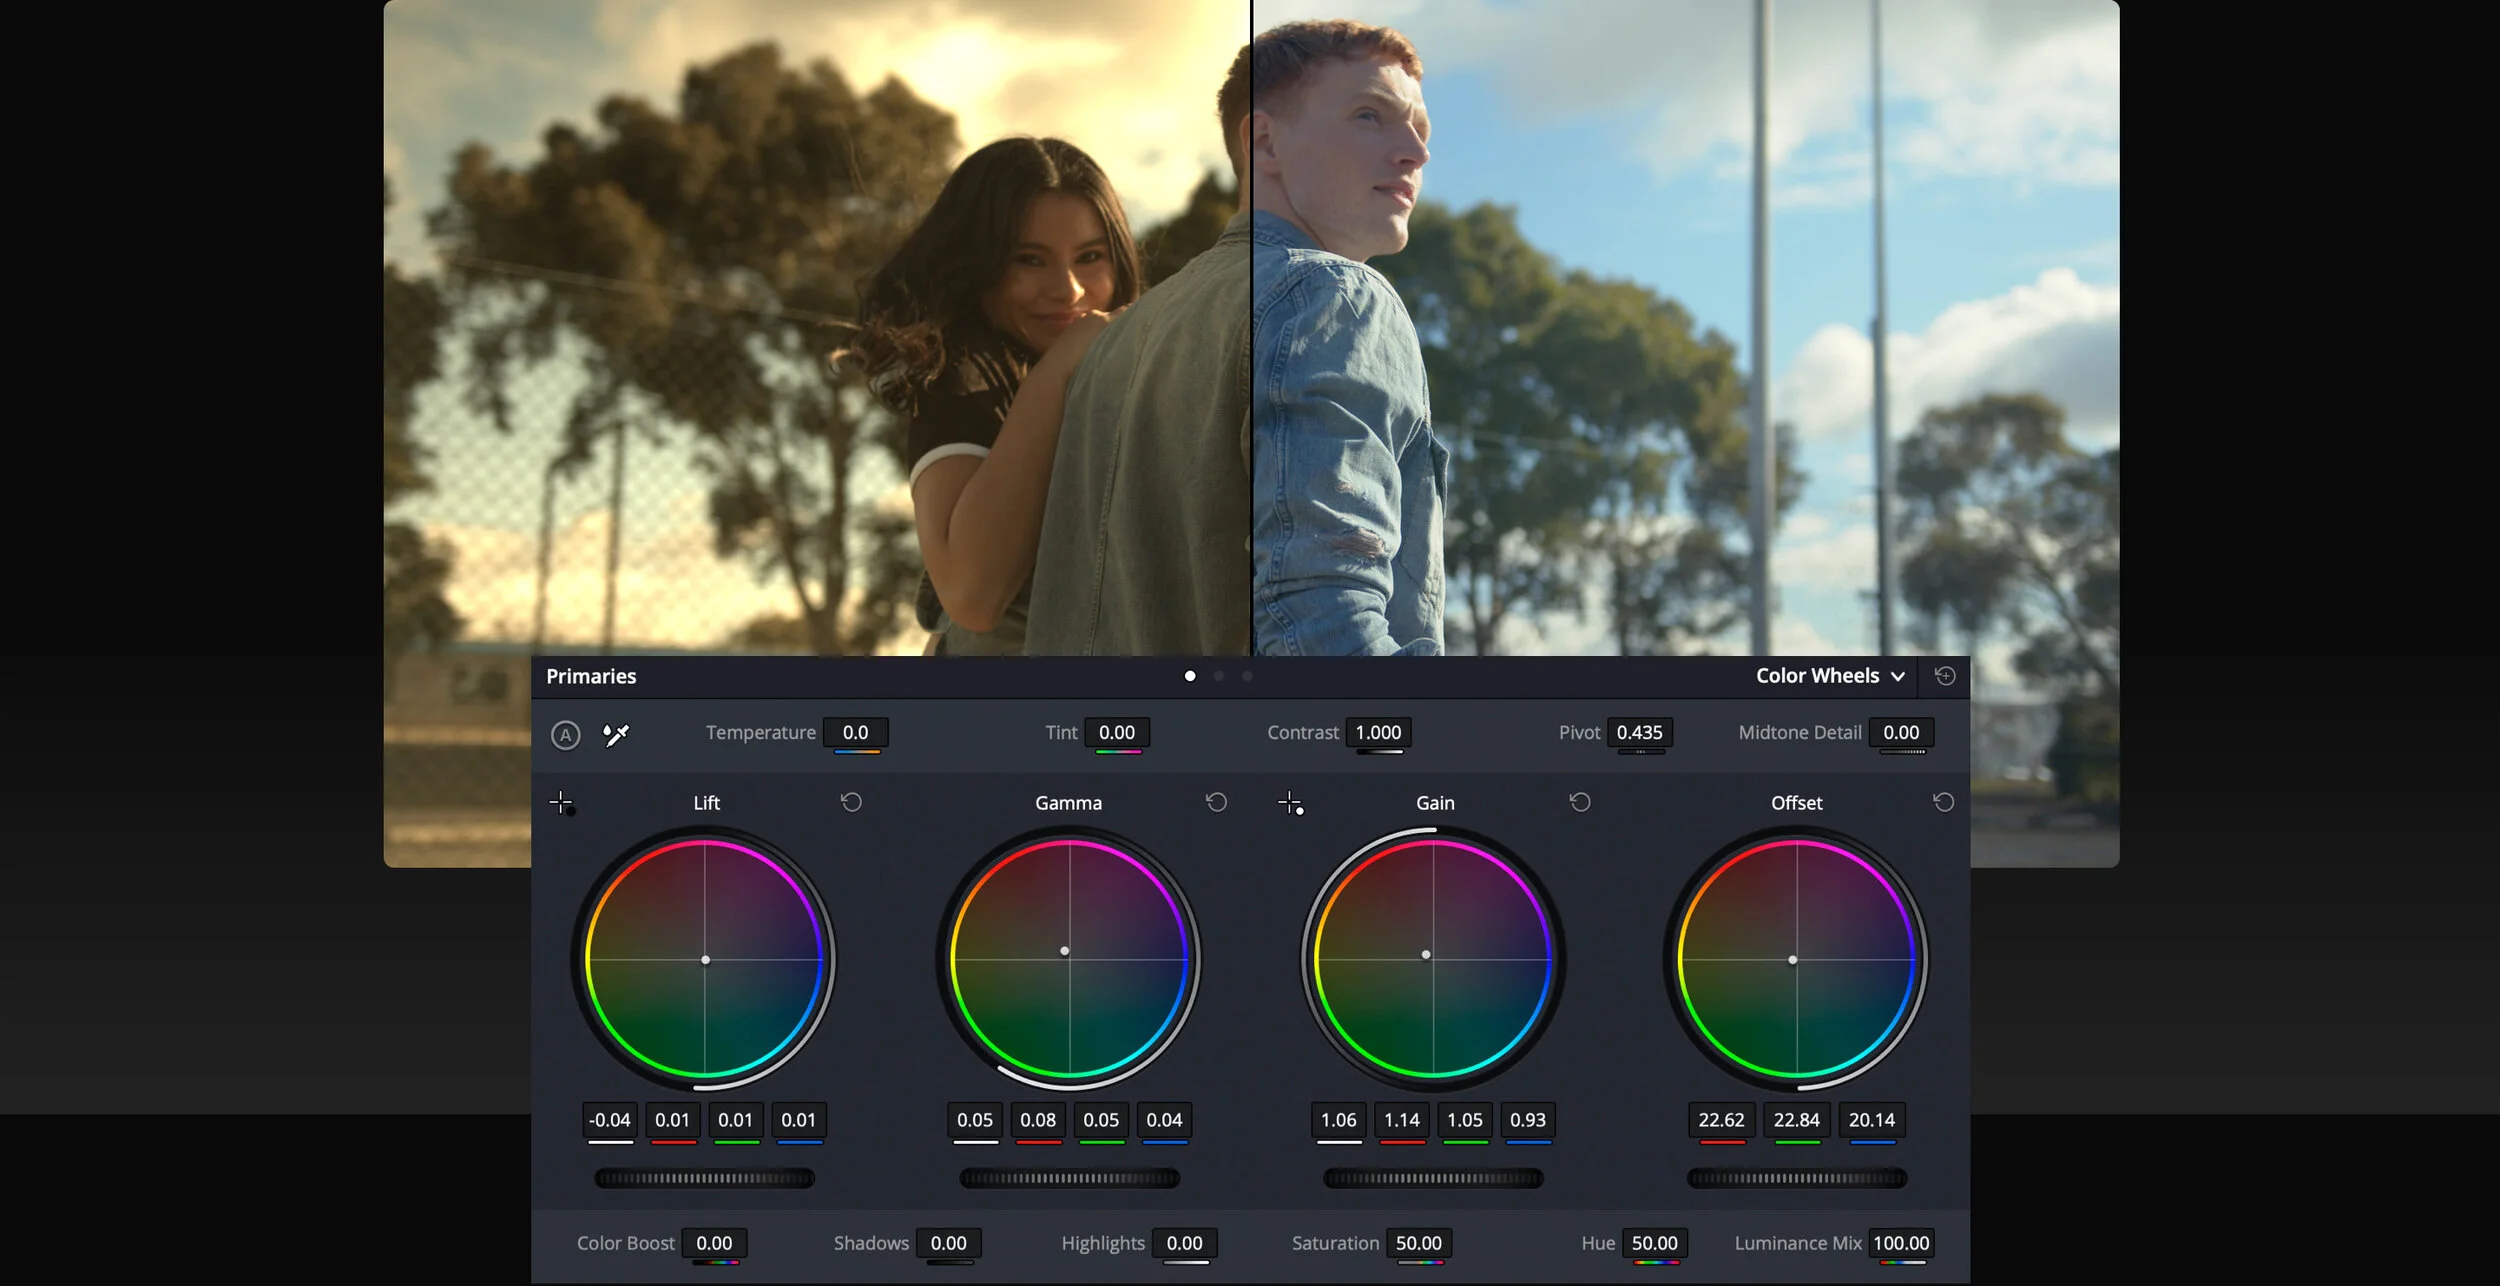
Color grading is a crucial part of the post-production process in TV commercials. It's the process of enhancing and manipulating the colors in a video to create a specific mood or atmosphere. Color grading can help make a TV commercial look more polished and professional, and it can also be used to create a cohesive look across a series of ads. In this blog, we'll take a closer look at the color grading process for TV commercials and why it's so important.
Color grading is essential in TV commercials for a few reasons. Firstly, it can help set the mood for the commercial. The right color palette can create a sense of excitement, calmness, or even urgency, depending on what the advertiser wants to convey. Secondly, color grading can help create consistency across multiple commercials in a campaign. By using the same color grading techniques across all the ads, they can feel like a unified set, and viewers will be more likely to remember the brand.
The color grading process can vary depending on the commercial, but generally, it involves the following steps:
Color correction: The first step is to correct any color imbalances in the footage. This involves adjusting the brightness, contrast, and saturation of the video to create a neutral starting point.
Establishing the look: Once the color is balanced, the colorist will work with the director or creative team to establish the look for the commercial. This could involve creating a specific color palette or mood board to guide the color grading process.
Primary grading: This is where the colorist adjusts the overall color of the footage. They might adjust the temperature of the footage, tweak the shadows and highlights, or apply a color filter to create the desired look.
Secondary grading: In this step, the colorist focuses on specific elements within the footage. For example, they might adjust the color of a particular object or person to make them stand out more.
Finishing touches: The final step is to add any finishing touches to the color grading. This could involve adding vignettes, adjusting the overall brightness, or adding any necessary color effects.
Choosing the right color grading techniques is essential to create the desired look for a TV commercial. Some common techniques include:
Color filters: Applying a color filter to the footage can create a specific mood or atmosphere. For example, a blue filter can make a scene feel cold and clinical, while a warm filter can create a sense of coziness.
Saturation: Adjusting the saturation of the footage can make the colors more vibrant or muted. This can be used to create a specific tone or to highlight certain elements within the scene.
Contrast: Adjusting the contrast can create a more dramatic look or a softer, more romantic feel. It can also be used to bring out details in the footage.
Color grading presets: Many color grading programs come with presets that can be used to create specific looks quickly. These presets can be a great starting point for a colorist to work from.
Conclusion
Color grading is an essential part of the post-production process for TV commercials. It can help set the mood for the commercial and create consistency across a series of ads. By choosing the right color grading techniques and working closely with the director or creative team, a colorist can create a stunning and memorable TV commercial.
Contact us - Colourstudio for world class color grading service in UAE.
Grading for vfx heavy projects is different than regular color workflow.
Key steps to follow -
1 ) Conform your edit in timeline and export the LOG to Linear Rec709.
NOTE- Fix the blue/green chroma if required to assist the chroma keying for vfx.
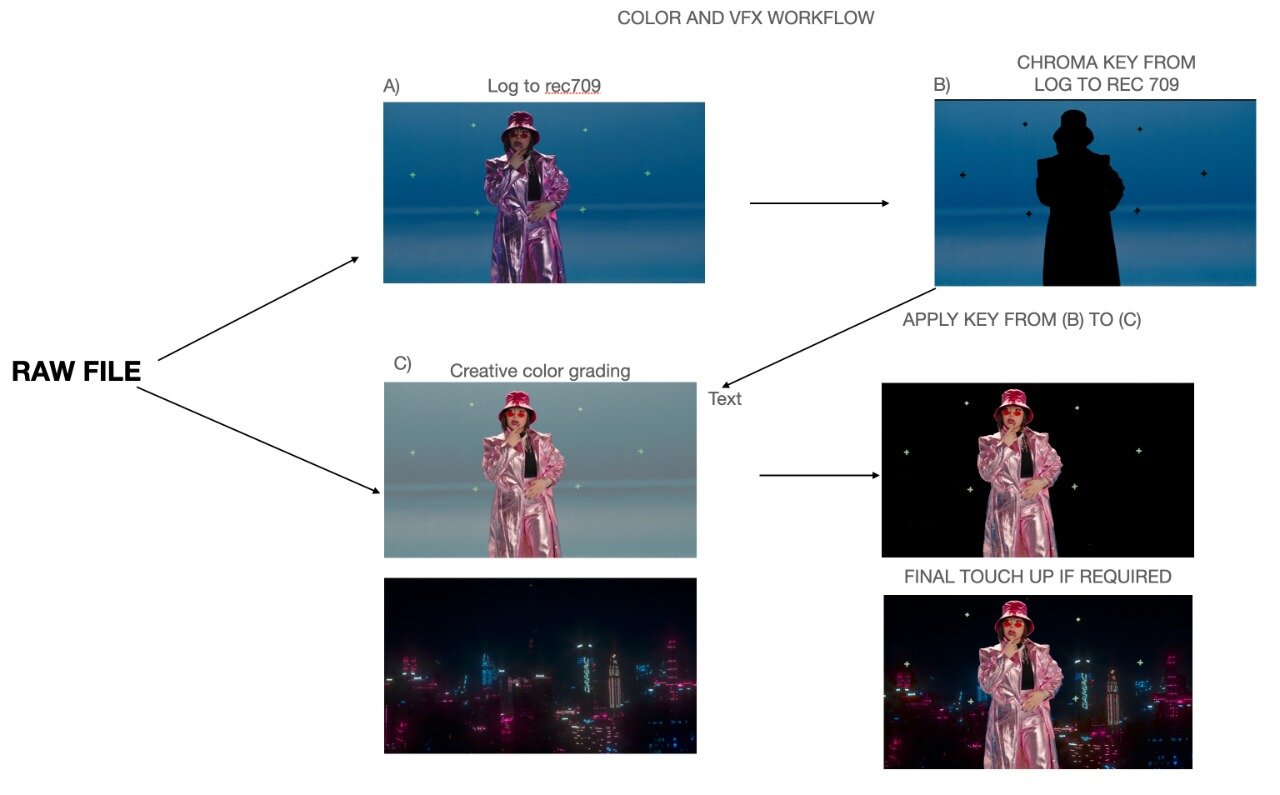
2) Set your look according to the vfx elements working closely with art direction/d.o.p/director for primary and secondary color grading.
3) Get file VFX comp and alpha mattes of all the shots for grading post VFX.
4) Final color grading.
(Choose any formats .exr or apple pro res 4444 for the workflow.)
Machine learning for live-action, scene-depth reclamation. Color correct and apply effects based on camera distance.

Use machine learning to generate 3D surface-orientation bump maps for color adjustment, relighting, and retouching.

GPU-accelerated rack defocus effect. Extract alpha mattes using machine learning with a new human face region Semantic keyer.

Isolate skies with a single click to remove clouds, add treatments to sky backgrounds, and more.

To know more about these features try - Autodesk Flame now.
Apple M1 chip with 8‑core CPU, 8‑core GPU, and 16‑core Neural Engine
16GB unified memory
1TB SSD storage
Gigabit Ethernet
In-Plane Switching (IPS) Technology
HDMI + DisplayPort + USB Type-C Inputs
2560 x 1440 WQHD Resolution
1500:1 Static Contrast Ratio
27" In-Plane Switching (IPS) Panel
DisplayPort | HDMI | DVI-D | USB Type-C
2560 x 1440 Native Resolution
1000:1 Typical Contrast Ratio
UltraStudio 4K Mini is a portable Thunderbolt 3 capture and playback solution packed with the latest broadcast technology! You get broadcast quality 8 and 10‑bit high dynamic range capture in all formats up to 4K DCI at 60p, and 12‑bit high dynamic range capture in all formats up to 4K DCI at 30p. Plus, the built in SD card reader lets you mount camera media directly on your computer so you can start editing immediately!
Multi Software support
3 x High-Resolution Optical Trackballs
9 x Programmable Knobs with Push Reset
9 x Programmable Function Buttons
Large Ice-White OLED Display Area
This is very basic requirement for cheapest 4k color grading solution. Price may vary according to the region.
This is one of the many ways in which Davinci Resolve can be configured in order to be able to deliver a Non-graded Archival Master (NAM) to Netflix .
Create a new project, go to the Project Settings > Color Management panel. The first thing you will want to change is the Color Science settings to ACEScct. If you don’t have a specific reason to use ACEScc, it is recommended to use ACEScct.
ACES Version will default to v1.1 which includes updated Output Transforms for HDR output color spaces. Generally, we recommend using the latest ACES version which, as of today, is v1.1.
Set your ACES Output Device Transform to match the calibration and capacities of your video display:
For SDR, this will be Rec. 709, which corresponds to a monitor calibrated to Rec. 709 / BT.1886 with 100 cd/m2 peak luminance.

For HDR, this will be P3-D65 ST.2084 (PQ) with the corresponding nit level your monitor is capable of. Today, most commonly, this will be P3-D65 ST2084 (1000 nits).

Make sure the ACES Mid Gray Luminance setting stays at 15.00 throughout the whole grading and finishing process.
Process Node LUTs will only apply in the event that you are loading LMTs as LUTs to the project. The setting will vary depending of those LMTs were generated.
An important note is that when the ACES Output Device Transform is set to None, Resolve will output ACES images a.k.a. ACES 2065-1 or ACES Linear (AP0).
By default, for RAW clips, Resolve will automatically debayer images into ACES and you should see a normal looking image.
For non-RAW formats (such as DPX, ProRes, XAVC, etc), Resolve may not automatically detect the color space, so you will have to manually select your ACES Input Device Transform (IDT).
You can do this by right-clicking on a shot or group of shots in the Media Pool, as shown in the screenshot below.
Example: you shot XAVC on the Sony F55 using the SLog3-SGamut3.CINE color space, and bring these clips into the Media Pool. Resolve is not able to recognize this based on the metadata, so you must manually select “Sony SLog3 SGamut3CINE” from the ACES Input Device Transform dropdown list.

You may also set your Project to default to a specific ACES Input Device Transform. This may be handy if the majority of your clips will be in a common color space and cannot be auto-detected.
TIP: Sorting your Media Pool by “Format” or “Video Codec” columns can help batch-assign IDTs to groups of clips highlighted at one time. See screenshot below for an example.

When you are ready to render your deliverables, open up the Deliver page.
IMF Master, Video Display Master (VDM) or Quicktime references
When rendering images in display color spaces, such as those required for IMF Master deliverables, a VDM source for IMF creation, or Quicktime references, make sure your ACES Output Transform is enabled and matches the intended display type.
For the Non-Graded Archival Master (NAM), make sure you turn off the ACES Output Transform in order to output ACES AP0/Linear data as shown below.
NOTE: For any interchange of images between facilities or softwares in an ACES pipeline, such as VFX plates, the following method should be used.

NOTE: The setting ‘Force debayer to highest quality’ will automatically select what Resolve considers to be the highest debayering quality for each RAW file on the timeline. This may differ from your own findings. Please feel free to select your preferred debayering algorithm instead, and untick this option if you prefer.
Note: Resolution may vary depending on the project’s framing, but should be at UHD resolution (3840 x 2160) or higher.
1 Since the ACES color space is Linear, the ACEScct and ACEScc spaces were defined as logarithmic (log) working color spaces, so that traditional color correction tools would feel similar to other log color spaces.
2 Rec.2020 is not used for Netflix deliveries at this time.
3 half = 16-bit half-float
4 No Output Tranform will output ACES Linear aka. ACES 2065-1 (AP0).
It’s time for work from home and now clients can attend color session via live streaming. The new feature in Assimilate scratch can change the industry forever and hope the technology evolves.
• Stream the current timeline out to Facebook, Youtube, or a custom streaming server
• Capture other live rtmp streams to comp into your own live stream
• Share projects between multiple systems in a single facility on shared storage
• SCRATCH online project repository to work with multiple artists simultaneously on a single project from places all over the globe.
• SCRATCH remote: connect multiple SCRATCH systems from all around the world for a creative grading session.
• Stream SCRATCH output directly to a media server for others to live view your creative work.
• Publish to SCRATCH Web, Facebook, Vimeo or YouTube to share content online and in a secure manner for review and approval.
• Sync Player: slave one or more SCRATCH players and (remote) control playback from the master system.
For live color grading session - contact me.
Color Pipeline Requirements
It is important to ensure that images are stored in the widest possible color space until the very final stages of the color pipeline. This is easily achieved by using ACES, which keeps images in a high dynamic range, wide color gamut space, and allows the user to simply select the Output Transform for the target viewing display. This can also be achieved while working in the dominant camera color space with careful, pro-active color management and the use of conversion and viewing LUTs. Both methods are outlined below.
Color pipeline documentation must be shared with production and post-production ahead of the first day of photography.
Non-ACES Pipelines (Camera Native + Show LUT)
On-Set & Dailies Colo


Click on image to download the luts.
These luts for vlogger are perfect to make your footage more cinematic.
This LUT pack will be some base luts to get you a finished look or to a good starting point. It works with Adobe Premiere Pro CC, Final Cut X, Davinci Resolve and Assimilate Scratch.
Blackmagic design recommended laptops for color grading in Davinci Resolve 14.

Approx US$ 3200.00
Intel Core™ i5 or i7 processors
32GB minimum system RAM
NVIDIA Quadro P4000; 8GB GDDR5 GPU
512GB SSD minimum system hard drive
http://www.dell.com/en-us/work/shop/productdetails/precision-17-7720-laptop

Approx US$4500.00
intel Core i7 processor
16GB minimum system RAM
Quadro P5000 with Dreamcolor display
1TB System drive
http://store.hp.com/us/en/ConfigureView?catalogld=10051&urlLangId=&langId=-1&storeId=10151
&catEntryId=1661652&quqntity=1

Apple MacPro
Late 2013 model,
12 Core Dual D700 GPU 2.7GHz
Intel Xeon E5 12 Core processor 32GB system RAM recommended
1TB PCIe-based internal flash storage Dual AMD FirePro D700 GPUs
Apple iMac with Retina Display
Mid 2017 27”Retina 5K model, quad-core i7 4.2GHz Intel Core i7 processor
32GB system RAM recommended
TB Internal SSD storage
Radeon Pro 580 with 8GB of VRAM
Apple MacBook Pro with Retina Display
id 2017 15” model, quad-core i7
3.1GHz Intel Core i7 processor
16GB system RAM
512GB PCIe-based SSD
Radeon Pro 560 with 4GB VRAM
Apple MacBook Pro with Retina Display
End 2016 15”model, quad-core i7
2.6GHz Intel Core i7 processor
16GB system RAM recommended
512GB PCIe internal flash storage
Radeon 450 with 2GB VRAM

Apple MacBook Pro with Retina Display
Early 2015 13”model, dual-core i5
2.9GHz Intel Core i5 processor
16GB system RAM recommended
512GB PCIe internal flash storage
Intel Iris Graphics 6100
Apple MacBook
Limited performance for more than HD ProRes Mid 2107 12”, dual-core i5
1.3GHz Intel Core i5 processor
8GB system RAM
512GB PCIe internal SSD storage
Intel HD Graphics 615
Apple Mac Mini
Optional Central Database Server
Late 2014 model, dual-core i7
3.0GHz Intel Core i7 processor
16GB system RAM
512GB PCIe internal flash storage
Intel Iris Graphics 5100


AICE is the marketing communications trade association whose members are independent creative editorial, design, visual effects, color grading and audio post production companies. It is dedicated to the advancement and promotion of these companies and the essential role their services play in the media creation process.
Colorist: Josh Bohoskey
LEAF- NADA
The Mill
Colorist: Jaime O'Bradovich
Beyonce - HOLD UP
Company 3
Colorist: Adrian Seery
Sia - The Greatest
MPC
HP Z31X Dreamcolor Studio Display - US $3999.00
HP has now unveiled its latest additions to the DreamColor lineup, targeted at the professional colorist and editors.
The DreamColor Z31x features support for multiple working color spaces, and the display's color gamut covers 100% of sRGB, 100% of Adobe RGB, 99% of DCI-P3, and 80% of BT.2020. It can also handle multiple frame rates, including native support of 60 Hz, 50 Hz, and 48 Hz (which would be exactly double the 24fps frame rate of film).
The HP Z31x is designed with the features demanded by industry-leading digital creators: an integrated KVM (keyboard/video/mouse) switch, True 2K viewing, markers and masks, and much more. The built-in KVM of the HP Z31x can switch between two computers with a quick keyboard shortcut, allowing the user to share one display, keyboard and mouse between two computers. Many artists have two computers, a Linux® box with their animation/compositing app and a Windows® box with Adobe® Photoshop or internet access.
“This monitor has become the de facto “standard reference monitor” for mastering HDR content, primarily due to its stability, uniformity, and fabulous contrast ratio,” - Josh Pines, Vice President of Imaging Research and Development for Digital Intermediates at Technicolor.
The New Sony BVM-X300 30-inch* 4K OLED master monitor is the flagship model in Sony’s professional monitor line-up. This high performance TRIMASTER EL™ OLED monitor includes unparalleled black performance, colour reproduction, quick pixel response, and industry-leading wide viewing angles. In addition, the BVM-X300 has enhanced interface and features for High Dynamic Range (HDR) live production, as well as a wide colour gamut conforming to DCI-P3 and most of the ITU-R BT.2020 standard*. By unleashing these superb features and qualities, this master monitor makes an ideal tool for a wide range of applications such as colour grading and QC (quality control) in the 4K production workflow.
Colour space - (colour gamut) ITU-R BT.2020*2, ITU-R BT.709, EBU, SMPTE-C, DCI-P3, BVM-X300 Native*3, S-Gamut/S-Gamut3*2, S-Gamut3.cine*2
EOTF - 2.2, 2.4, 2.6, CRT, 2.4(HDR), S-Log3(HDR), S-Log 3(Live HDR), S-Log2(HDR), SMPTE ST 2084(HDR) , HLG SG1.2(HDR), HLG SG Variable(HDR)
PRICE - Approx US $17,995.00
The MediaLight 6500K Bias Lighting System was developed to provide an accurate dim surround bias light solution for the most demanding home theatre and professional video applications. Proper bias lighting reduces eye strain and is a critical component of a color-critical viewing environment.

The MediaLight 6500K is the solution to this problem with a CRI greater than 90 and color temperature accuracy previously only found in fluorescent based bias lights.
The MediaLight 6500K is USB powered, comes with a PWM dimmer and remote control, and has an easy to use peel and stick adhesive backing that makes installation fast and easy. MediaLight strips can also be easily cut to size making them perfect for any size monitor.
The MediaLight 6500K can be powered directly from the USB port on DM series FSI monitors as well as most consumer televisions. It is also equipped with an AC power adapter for displays or applications where USB power is not available.
For more info :- MEDIALIGHT
Professional color grading rooms require careful attention in order to ensure colors are perceived accurately. SP-50 paint is carefully formulated to match modern color grading monitor performance and, therefore, optimize viewing conditions.
A typical setup will consist of painting the wall behind the monitors with SP-50. An ideal configuration will have all walls painted with calibrated paint. The ceiling can be non-reflective black or SP-50.
Whether we know it or not, properly matched capture from each of our cameras is not only the right thing to do, it is a professional expectation. When camera teams are hired to cover an event or shoot a corporate video and three cameras are to be used, there is an unspoken understanding that the footage from each device will match.
Even seemingly simple footage is actually quite complex. There is a blend of elements, from grain and noise, to exposure and white balance.
If it’s impossible to bring matching equipment, choosing all of the camera settings prior to the shoot and then monitoring and adjusting prior to shooting will make the difference.
The best bet is to try to make enough time to test and work with the cameras prior to a shoot starting to at least get them close. Usually the larger the budget, the more setup and testing time there will be, but even with no lead time, a basic knowledge of how to set up cameras is important.
Choose the frame size and rate that the project is to be delivered in and set each of the cameras to exactly those settings.
Ensure the shutter speed, also refered to as shutter angle, of each of the cameras is set the same. Shutter speed has a huge impact on the appearance of finished footage. Action sequences can benefit from overly quick shutter speeds, but a good starting place is generally around double the framerate of the camera.
Each camera is different, but there should be tools for white balance on board. Most have a number of presets, and the more professional models will allow for custom white balancing, where a white card is held in front of the camera and set as the white that is recognized by the camera.
The key is to set the cameras to a similar setting to ensure that they’re close. If they all offer custom white balancing, that is obviously the best option.
Start with each camera set to the same ISO level and adjust. Many cameras have a default ISO, but the environment, lens characteristics, sensor characteristics or other factors can determine whether the level needs adjusting to more closely match other cameras.
While some high-end cameras that shoot RAW footage can have exposure tweaked a bit in post production, setting ISO properly in-camera is essential.
Adjusting the camera’s ISO to be as low as possible while delivering a nice, balanced image is key.

Result of using ALGORITHMIA to colorize black and white image.
Yes. Its time for automatic colorizing black and white photos to color.
The research has long way to go before we see content aware colorize in photoshop, davinci or assimilate scratch, but proof of the concept is there exists.

You can try automatic coloring your b/w images now. Click Here


Color Improvements
Resolve FX Improvements

Media Improvements
Codec & Format Improvements
DOWNLOAD FREE DAVINCI RESOLVE HERE.

Maria Claudia Cortes '03 (M.F.A., computer graphics design) has been receiving widespread praise for her RIT thesis project, an animated Web site titled Color in Motion. The project received Best of Category honors in the I.D. Magazine 2004 Student Design Review competition, it was featured by Communication Arts Magazine in the 2004 Interactive Design Annual, and also made the pages of the December 2004 issue of Proyecto Diseno, the leading design magazine in Cortes' home country, Colombia.
Cortes joined Eastman Kodak Company in 2003, working first in Rochester and now in Bogota, Colombia, for the Technical Knowledge Management Department. She is a multimedia developer and graphic designer.