davinci resolve free training

How to color grade videos? Guide

How to Color Grade?

Color grading is the process of adjusting the colors and tones of a video to achieve a specific look or mood. Here is a general overview of the steps involved in color grading a video:

  1. Correct any technical issues: Before color grading your video, it's important to ensure that the video is technically sound. This can involve adjusting the exposure, white balance, and contrast to ensure that the footage is well-exposed and has accurate colors.

  2. Choose a color grading software: There are many color grading software options available, including DaVinci Resolve, Adobe Premiere Pro, Final Cut Pro, and others. Choose a software that suits your needs and preferences.

  3. Create a reference image or video: Before color grading your video, it can be helpful to create a reference image or video that represents the desired look. This can involve taking inspiration from other films, photographs, or art.

  4. Apply a LUT or preset: Some color grading software may include built-in LUTs (Look-Up Tables) or presets that can be applied to your footage to achieve a specific look. Applying a LUT or preset can be a good starting point for your color grading.

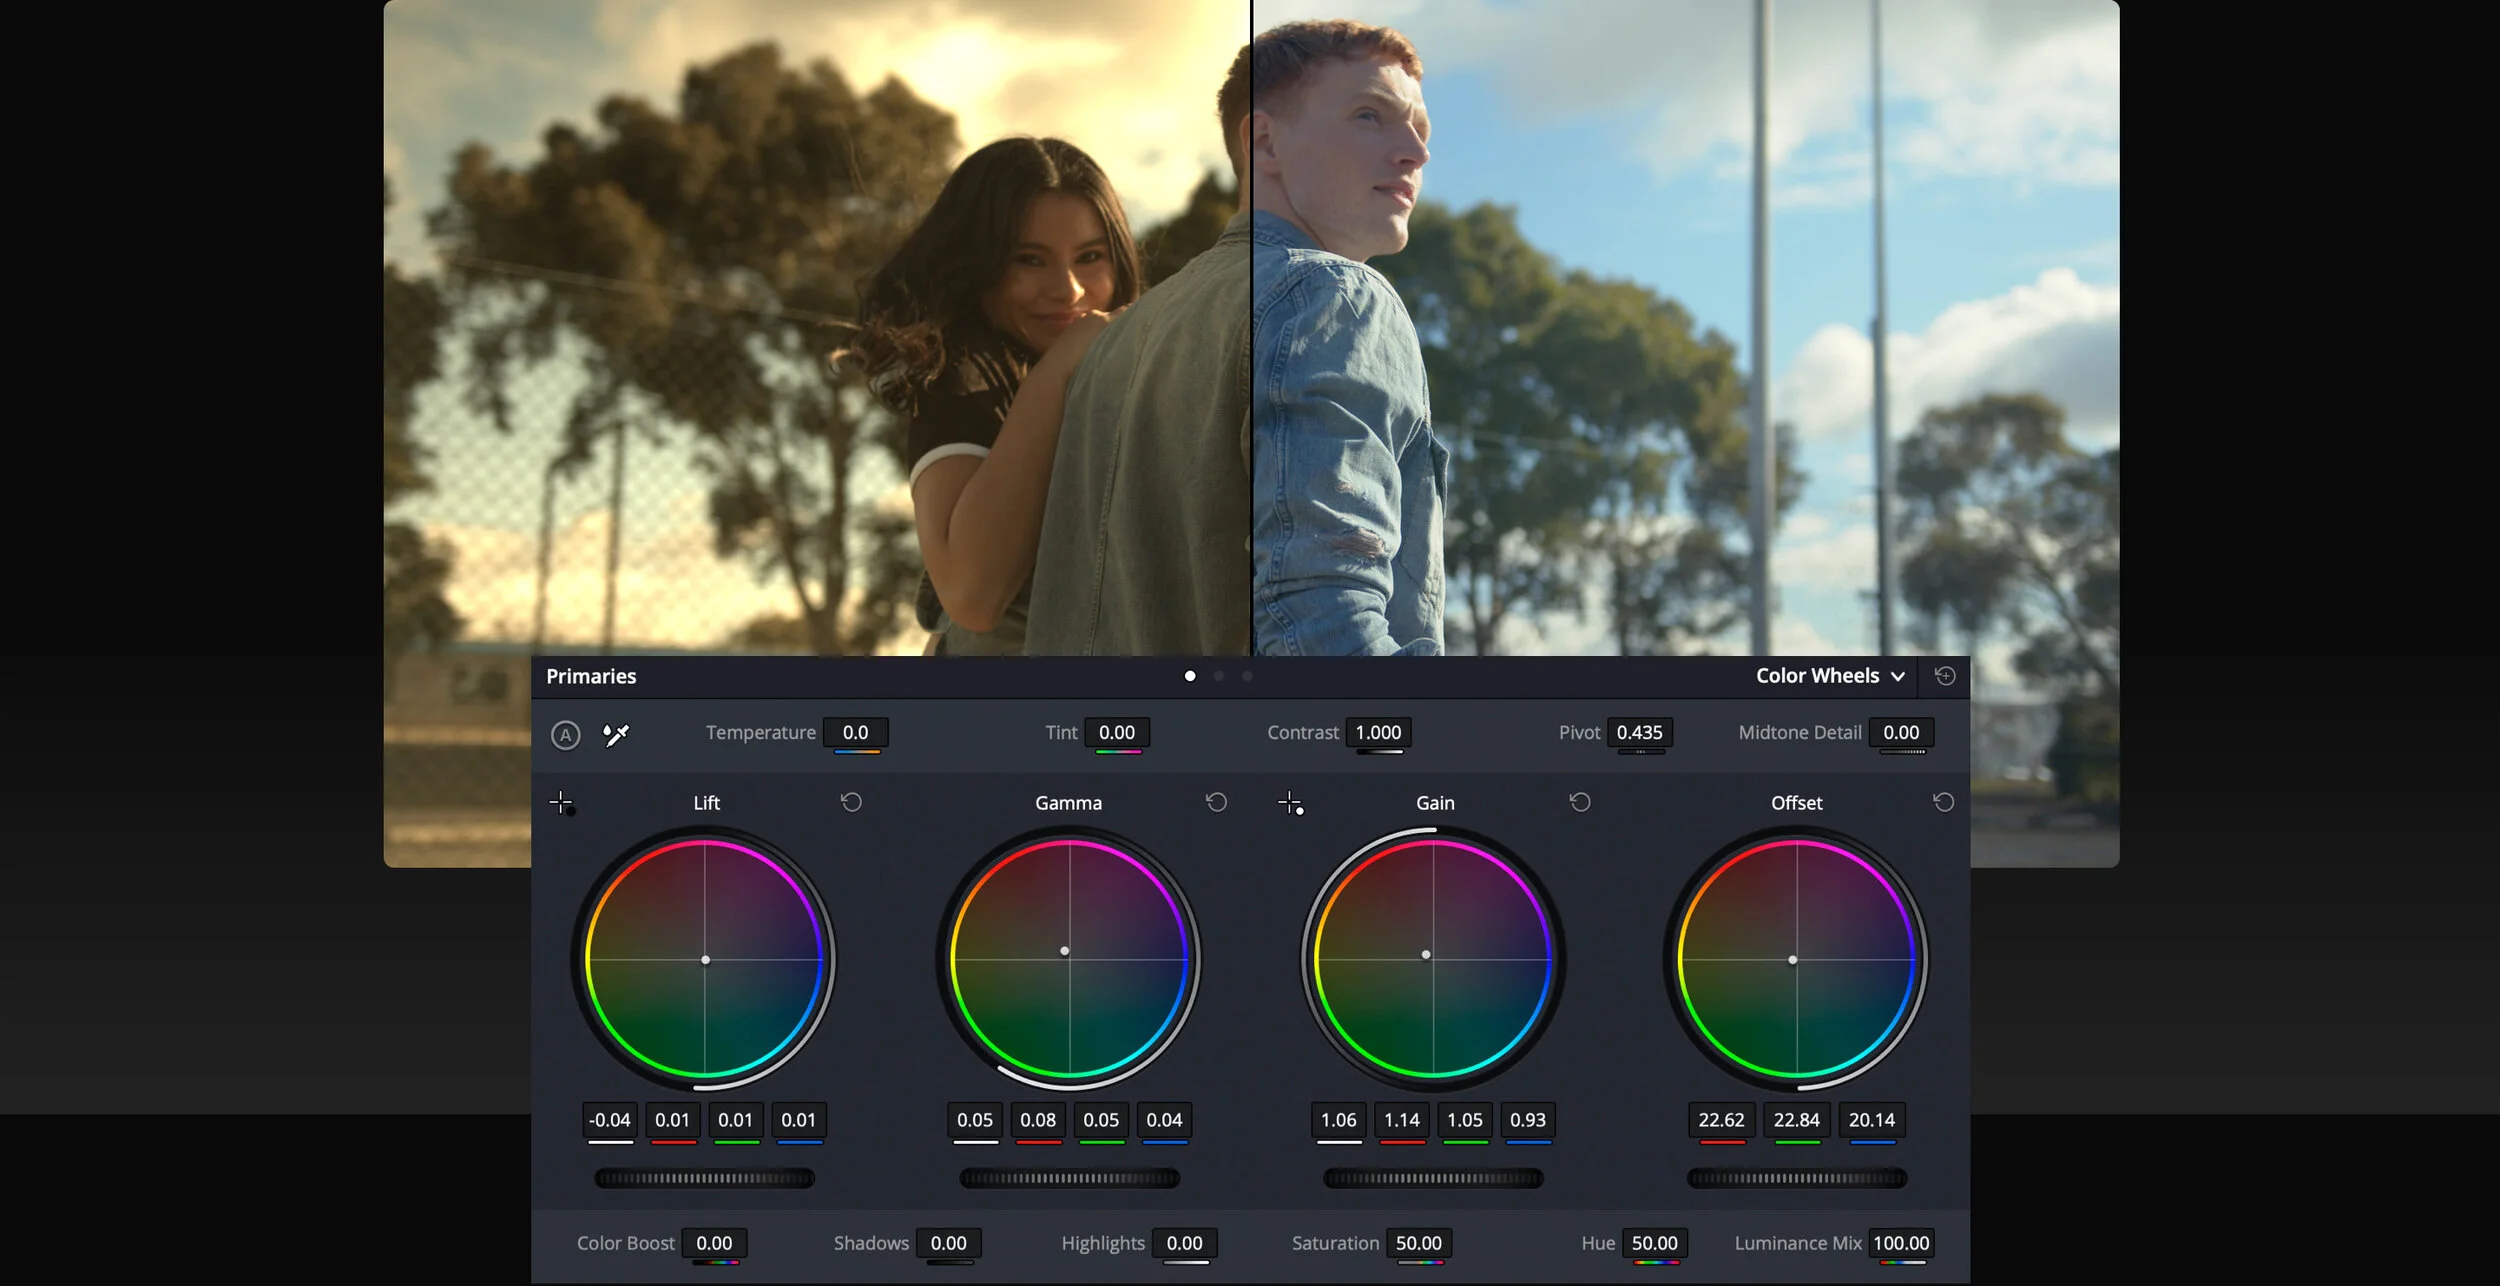
  5. Adjust the color wheels and curves: Use the color wheels and curves in your software to adjust the hue, saturation, and brightness of your footage. This can involve adjusting the shadows, midtones, and highlights to achieve a balanced and pleasing color palette.

  6. Adjust the exposure and contrast: Use the exposure and contrast tools to adjust the overall brightness and contrast of your footage. This can involve boosting or reducing the brightness and contrast to achieve a specific look.

  7. Refine the color grading: Once you have adjusted the color wheels, curves, exposure, and contrast, refine your color grading by adjusting the colors and tones of specific elements in your footage, such as skin tones, backgrounds, and objects.

  8. Apply the color grading to the entire video: Once you are happy with your color grading, apply the adjustments to the entire video. This can involve copying and pasting the adjustments to other clips or using adjustment layers to apply the color grading to multiple clips at once.

  9. Review your color grading: Finally, review your color grading to ensure that it meets your creative vision and technical standards. Watch your video on different monitors and devices to ensure that the color grading looks consistent across different platforms.

Color grading can be a complex and time-consuming process, and it's important to have a good understanding of color theory and video editing principles before attempting to color grade your footage. With practice and experience, however, you can achieve stunning and creative results through color grading.

Learn One on One Color grading with us at our Boutique Colour Studio In UAE.

Free Color Grading Tutorial

I have decided to give free color grading tutorial service to all my website visitors. You can request for any kind of color grading tutorial request in any of the following color grading softwares (Assimilate Scratch, Filmlight Baselight and Davinci Resolve. You can ask me any question related to color grading. I will try my best to reply within 24-48hrs. The tutorial will be released in my personal youtube channel and instagram accounts. You can support by subscribing and following my accounts.

Davinci Resolve Free Tutorial - Goat Eye View

Best Davinci Resolve Tutorial

If you are aspiring editor or colorist and looking for great resource to learn Davinci Resolve Software then we highly recommend Goat Eye View - Davinci Resolve tutorials.

Goat's Eye View, London-based post-production for film and television has produced a series of Davinci Resolve color grading tutorials by Daria Fissoun.
For more info - www.goatseyeview.co.uk


BIG UPGRADE - DAVINCI RESOLVE 12.5.1

General Improvements

  • Alpha-numerical listing of codecs and format in the Deliver and Media Management pulldowns
  • When running DaVinci Resolve in window mode, the macOS dock is now visible
  • Improved latency for remote grading (Studio version)
  • Improved handling of dissolves and overlapping clips in DolbyVision metadata export (Studio version)
  • Improved behavior when creating render jobs on locations without write permissions
  • General performance and stability improvements

Edit Improvements

  • Improved 2-up and 4-up, multicam and playback performance when using QuickTime ProRes on Windows
  • Added menu items to allow selection of clips based on Flag, Marker and Clip colors on the edit timeline
  • Added ability to import and export duration markers using EDL
  • Added the ability for clips to snap to their own markers when adjusting In and Out points
  • Improved consistency of edit functions when Timeline is in full-screen mode
  • Added support for box wipe mode for offline reference wipe
  • Added ability to extract AAF import log information as timeline markers

Color Improvements

  • Improved performance for Spatial Noise reduction in Better mode
  • Improved listing of attached and timeline mattes in the node graph with support for alphabetical listing
  • Added ability to apply grades from a reference wipe using the viewer context menu
  • Added ability to align keyframe timelines of color grades using playhead position and wiped still frame
  • Next node and previous node operations now loop around the node graph
  • The ‘displayed’ node graph now automatically updates when the current still is changed
  • Swapping nodes now also swaps the node labels
  • Rippling grades now also copies node labels, Power Window labels and node cache settings
  • Shift Up + Next Still will now append grade from the current still on the advanced control panel (Studio version)
  • Added support for left eye and right eye grades for the timeline node graph (Studio version)
  • Added ability to convert a mono timeline into stereoscopic 3D (Studio version)
  • Added ability to convert a mono clip into stereoscopic 3D (Studio version)
  • Added support for sequence and node render caching for stereoscopic clips and timelines (Studio version)
  • Added compensation for stereoscopic slip when exporting timecodes in ALE (Studio version)
  • Added support copying DolbyVision grades using stills and middle click (Studio version)
  • Improved 3D and Qualifier panel layout in dual screen mode
  • Improved behavior to stay in the same frame when joining two clips

Resolve FX Improvements

  • Added ResolveFX Generate Color (GPU accelerated)
  • Added ResolveFX Tilt-shift Blur
  • Added support for anamorphism in ResolveFX Lens Blur (Studio version)
  • GPU acceleration support for ResolveFX Lens Flare (Studio version)
  • Ability to adjust Shadows/Midtones/Highlights in ResolveFX Film Grain in all compositing modes (Studio version)
  • GPU acceleration support for ResolveFX Emboss, Waviness, Vortex, Ripples, Dent, Mirror
  • Improved ResolveFX Scanlines and added various composite modes
  • Ability to view the ResolveFX Scanline layer without the background
  • Improved border behavior for ResolveFX Gaussian Blur, Directional Blur, Mosaic Blur, Radial Blur and Zoom Blur
  • Added support for horizontal/vertical ratio in ResolveFX Glow
  • Added support for pan and tilt on ResolveFX Prism Blur
  • Improved performance for ResolveFX Light Rays
  • Improved performance for ResolveFX JPEG Damage

Media Improvements

  • Added new Import Media options to File menu and Media Pool context menu
  • Added support for stereoscopic 3D clips in Media Management (Studio version)
  • Added support for display drive names in Media Storage on Windows
  • Addressed issues with open file location from Media Pool on Linux
  • Added Source Name tag support for filename without extension
  • Added support for automatically setting pixel aspect ratio for anamorphic ARRIRAW MXF clips

Codec & Format Improvements

  • Added support for ProRes decoding on Windows
  • Improved QuickTime decode and encode performance on Windows
  • Support for UHD H.264 renders on Windows
  • Improved QuickTime decoding and encoding performance on Linux
  • Added support for HEVC (H.265) decoding on Linux
  • Added support for alpha channel in DNxHR 444
  • Added support for the Sony X-OCN format
  • Added support for various AAC encode parameters on macOS
  • Added support for QuickTime AAC audio encoding on Windows
  • Added support for encoding QuickTime Photo JPEG files
  • Added support for decoding AVCHD files from the Sony NEX-FS700 camera
  • Added support for V-Gamut in RCM for improved Panasonic camera image handling
  • Added ARRI LogC to Linear and Linear to ARRI LogC LUTs in VFX I/O
  • Addressed decoding of last frame in some Panasonic AVCHD clips
  • Improved handling of AVCHD .MTS clips
  • Added support for RED SDK v6.2.1

DOWNLOAD FREE DAVINCI RESOLVE HERE.